The Manufacture of Brass Needle Cases
The following narrative was original researched in 2011 and was published in the book My Avery Needle Case Collection by Terry
Meinke in April 2012. No changes have been made other than dividing it into more sections to make it easier for individuals to
access the information they are interested in. The sections are:
Introduction
People Involved in Making and Distributing Stamped Needle Cases
Birmingham
Creating the Brass
Preparing the Brass
Creating the Needle Case Design
Preparing the Design Sketch and Layout
Creating the Mold or Dies
Stamping the Needle Case
Adding Decorative Detail
Assembly, Gilding and Electroplating
Finishing the Needle Case
Needle Case Sales and Distribution
Summary
Introduction
I’ve always wondered how they made brass needle cases. How did they get such wonderful detail? Because I knew next to nothing about metalworking, initially I thought it was a simple casting process; molten brass poured into a mold from which the fully assembled needle case miraculously appeared after cooling. The true process, I discovered, was far more complicated and interesting than I originally thought.
For advice on brass I turned to my brother Drake. In 2012 Drake will be opening the first copper museum in the U.S.A., to coincide with Arizona’s centennial as “The Copper State.” The Copper Art Museum of Clarkdale, Arizona, will be located near the site of one of America’s largest copper mines, which closed in 1953. For years Drake has collected copper art from around the world and as a result has become an expert on the topic. Since brass is an alloy of copper and zinc, the process for making something in copper is similar to the process used to create something in brass. In 1995 Drake visited Birth-Gramm SA, a copper manufacturing company in Lamone, Switzerland, just north of Lugano. During his visit the company gave him a personal tour of the facility which included the production line for decorative copper food molds, illustrating the entire process from design stage to finished product. Although this modern factory uses computers and electricity not available during the Victorian period, many of the processing steps have changed little in the past 100 to 150 years.
From my discussions with Drake I made a list of all of the steps we thought were necessary to make a brass needle case. After developing the list, my goal was to research each step, and then write a short paragraph about each--in layman’s terms. Every step involved a different worker with a unique role. Without the skills of these individuals the needle case would not exist for us to enjoy today. Knowing the details of their manufacture would infuse greater meaning into the lovely objects in my collection.
At first my list consisted of 15 steps. Since I knew Drake and I were not experts in this area, I did some additional research online which included reading parts of Timmin’s “Industrial History of Birmingham and the Midland Hardware District” and Aiken’s “Early History of Brass and the Brass Manufactures of Birmingham”. My research included consultation with several individuals, including Martin Ellis, the curator of the Birmingham Museums and Art Gallery, and Jo-An Gloger, Keeper of Collections at the Forge Needle Museum in Redditch. As a result I was able to add an additional five steps to my list, but more importantly it confirmed our assumption that needle cases were made of stamped brass. Vin Callcut, author of the ‘oldcopper.org’ website, provided me with the most generous assistance. Vin is a retired copper metallurgist from England who spent 57 years working in the copper industry. He is considered one of the top historians on the topic in the UK. In addition to adding ten more steps to my list, Vin helped to clarify all of the processes that I found confusing.
As you read this chapter, take a moment to reflect on each of the skilled individuals who made the fancy brass needle case possible. When you have finished, take one of your favorite needle cases and hold it in your hand, close your eyes and feel the presence of all of those people!
People Involved in Making and Distributing Stamped Needle Cases
- The prospector who discovers the location of the raw ores.
- The mining engineer who extracts the ore from the ground.
- The refiner who crushes the ore out of the surrounding rock, leaving behind waste called tailings, then melts the ore and creates metal ingots.
- The railway worker who transports the ingots from refineries to foundries.
- The founder who alloys copper with the right amount of zinc to make the best brass and then casts it to rectangular cakes for rolling.
- The machinist who mills each side of the brass cake clean so that cast surface impurities do not get rolled into good quality brass.
- The furnace operator who reheats the cakes for initial hot rolling.
- The hot mill operator who rolls the red hot cakes to plate thickness.
- The pickling shop operator who lowers the brass into diluted acid to clean off the hot rolling mill scale.
- The strip mill worker who passes the cold brass through rolling mills several times to obtain the necessary thickness for brass strip.
- The annealing furnace worker who, between rolling mill passes, reheats the brass to soften it again for further rolling.
- The slitter operator who uses a machine to cut the strips of rolled sheet brass to the proper width.
- The designer who creates a needle case design that will appeal to the customer.
- The production engineer who breaks the design down into design and technical components and creates a pattern for the needle case.
- The die maker who turns the design pattern into the concave and convex sides of the mold (dies).
- The stamper who uses tools and equipment to press the sheet metal between the two dies to form the needle case parts.
- The toolmaker who makes the small punches and dies used to add extra detail.
- The piercer who cuts out the component parts from the surrounding metal and/or cuts out details where appropriate depending upon the design.
- The engraver or embosser who adds letters, trade and/or registry marks or other ornamentation to the needle case.
- The assembler or finisher who brings all component parts together by bending the brass into the correct shape and attaching them to each other.
- The metal finisher who electroplates (dips the finished item in chemicals) to enhance its appearance.
- The burnisher who polishes the needle case.
- The lacquerer who covers the needle case with a coat of lacquer to protect it from oxidation (tarnishing) to maintain its appearance.
- The inspector who examines each case to ensure it has been made correctly.
- The packer who puts each case carefully into its presentation box for safe transport.
- The sales manager who promotes the needle case to retailers.
- The retailer who sells the needle case to the public.
- The original owner who purchases the needle case the first time and treats it with care for years.
- The antique dealer who obtains needle cases from a variety of sources.
- The collector who purchases the needle case from the auctioneer, antique dealer or other source.
Birmingham
Fancy brass needle cases were produced only during a short 22-year period between 1868 and 1890. Most of the patents for these items were registered to companies in Birmingham, England, the city known in the 19th century as the center for brass manufacturing. Because of its skilled workforce, Birmingham not only produced the highest quality items but also led innovation in brass metallurgy. In the late 18th and early 19th centuries, the city had developed an efficient transport network which enabled it to quickly and efficiently receive copper and zinc from distant sources, overcoming the lack of natural mineral deposits in the area. Foundries had been built so that brass could be manufactured in town reducing the cost of production. In addition, the city’s rolling mills and the brass stamping process that utilized rolled sheet brass had been perfected, along with the electroplating process. All of this meant that the city’s workforce could develop metalworking skills far superior to those of workers elsewhere in the world. Imperial transport networks linking Britain with the British colonies provided Birmingham manufacturers with the means to distribute their products throughout the world. By the time Birmingham began producing the first fancy brass needle cases in 1868, everything was in place to ensure a successful operation.
Creating the Brass
The first step in creating a brass needle case is obtaining the metals required for making brass. Various combinations of copper and zinc are used to create brass, and by the mid-19th century Europe already had a number of major copper mines in operation. Many years earlier copper deposits had been discovered in Cornwall in southwestern England and in Anglesey, an island off the northwest coast of Wales. As commercial mining developed, mining companies moved into these areas and developed modern methods of extraction. Although most of today’s copper is extracted from open-pit mines, the earlier Victorian mines employed underground shafts to exploit copper deep in hard rock formations. In an open-pit mine workers use explosives to dislodge large sections of rock at a time, then giant shovels load the rock onto huge trucks that drive the long winding road up out of the pit to deliver the ore to the smelter. The trucks that are used look like ants when they are deep in the mine; however when they arrive at the top one can see they are almost the size of a small house.
Victorian underground mining was quite different because they did not have vehicles like the ones used today. Once a copper or mineral outcrop was discovered on the surface of a hill or mountain, a vertical shaft was dug into the rock to determine the location and type of ore. Based on the findings from the initial shaft, additional horizontal shafts would be cut and a cavern was created where the deposit was located. Tracks were laid to the interior where workmen used picks and axes to excavate the ore and shoveled it into carts that were pulled out of the cavern by small engines like those on a single track railroad. Like all mining at the time, it was hard and dangerous work, with men often killed by cave-ins, poisonous gas and other calamities.
By the 19th century Swansea became the dominant center for smelting and refining copper. Its port on the southern coast of Wales made a perfect location for trading with other areas, while the nearby Welsh coal mines provided the energy to fire the smelting furnaces. Copper ore from mines all over the world was shipped to Swansea for processing. As a result the town received the nickname 'Copperopolis'. After the copper ore arrived it was sold at auction and the winning bidder loaded it onto barges for transport to the refiner’s wharf up river from the town. The rocks were then hammered into small pieces or crushed and the waste rock (called ‘tailings’) were separated from the ore and discarded. Next the ore was transferred to a furnace where it was heated to a high temperature, but below the melting point, so impurities (known as ‘slag’) could be removed. This process, called calcination, was repeated several times at varying temperatures using different amounts of oxygen, with the objective of separating the copper from other elements, such as iron, sulfur and silica. Once the copper ore reached the correct level of purity, it was melted and poured into cast iron molds, to form ingots, which could be transported from the refineries to brass foundries, with Birmingham receiving a large portion. The smelting process released sulfuric acid into the atmosphere causing pollution, which killed much of the vegetation around the refineries. Mounds of slag and tailings deposited near the refineries disfigure the landscape to this day.
In Swansea, refineries dealt with zinc using a slightly different process. The zinc ore, also known as calamine, was mined in England and Europe in a way similar to that of copper, but the smelting process was quite different. After hand-picking to remove as much waste rock as possible, workers heated the ore in a furnace until it was red hot to remove sulfur and carbonic acid, which left zinc oxide. However to obtain pure zinc, the oxygen also needed to be removed. This was done by mixing the oxide with coal, crushing the mixture, then placing it in a large covered container with a tube leading out of the top. The container was then placed into a special domed furnace where it was kept at a very high temperature for several hours, while the tube was connected to a water-filled vessel located under the furnace. When the heat caused the carbon from the coal to mix with the oxygen in the zinc oxide, the zinc evaporated and condensed into the tube, then dropped into the water in the vessel. This zinc was collected, melted and formed into ingots, called ‘spelter’.
Preparing the Brass
When manufacturing first began in Birmingham, the city imported brass from elsewhere in Britain; however, by the late 18th century Birmingham foundries manufactured their own. Copper and zinc ingots arrived at the brass foundries by boat using Birmingham’s many canals, or by train. There workers weighed them, placed them in a furnace and melted them together in various proportions depending upon how the brass would be used. The molten metal was then poured into cast-iron molds to create rectangular brass cakes.
Many properties made brass appealing, including its brilliant yellow color which resembled gold but without gold’s costliness; its strength, for brass is stronger and harder than copper; its malleability, which made it easy to work; and its resistance to corrosion from salt water. The percentage of copper determined the quality of the brass. Blends of 80% copper and 20% zinc created the finest brass, the kind that wouldn’t crack during or after stamping, the kind most likely used to create brass needle cases. Some needle cases are, however reddish in color which indicates they had less zinc, perhaps only 15%. Occasionally 12-20% of nickel was added to give the brass a silver appearance - this was called ‘nickel silver’. After the brass cakes cooled, many were transported to a rolling mill for additional processing, for sheet brass was one of the most common materials needed for manufacturing a range of different products.
Before an item could be stamped to make a needle case, the brass needed to be converted into thin strips that could be inserted into the stamping press. In order to create high quality sheet brass for items such as needle cases, the brass cakes needed to be rolled numerous times until they reached the desired thickness. Before rolling began, the thin layer of impurities that had formed during the molding process was removed from the faces of each brass cake. After this, workers heated the cakes in a furnace until they turned red hot and then fed them through steam powered rollers which flattened the cake by reducing its thickness and increasing its length. Rolling continued until the brass strip became hardened and difficult to roll. At this point it was reheated again until red hot, cooled and then rolled again. This process (called ‘annealing’) continued a number of times until the brass reached plate thickness. The elongated strip was then sent to the pickling shop where workers dipped it into a solution of diluted sulfuric acid to remove oxidation and the hot rolling mill scale that had built up during the rolling process. Strips to be used for stamping were sent to a strip mill where they were annealed again and rolled until they reached the correct thickness (or ‘gauge’). A machine called a slitter, which resembled a giant pasta cutter, cut these strips to the specific width ordered by the customer. The brass strips cut for needle cases were only a few inches wide, the width of most fancy brass needle cases.
Creating the Needle Case Design
One of the most difficult tasks involved in producing a brass needle case is creating the design. Reconstructing the creative process used during the Victorian Era presents some difficulties; however, one can make assumptions based on the way designs are created today. Victorian needle manufacturers had already developed the needle case itself as a way to promote the sale of their needles. Most large companies likely employed market researchers to determine what kinds of designs might appeal to consumers. Small manufacturers almost certainly came up with the designs for their needle cases themselves.
W. Avery & Son, the company that produced the majority of figural brass needle cases, was just such a small business. The owner, his wife, parents, brothers, children, and other relatives and/or friends may have generated the initial ideas for the designs. We know the Avery family had relatives in Birmingham, and during a visit, they saw the different types of merchandise manufactured there and may have gotten ideas from Birmingham’s already successful brass industry. The Avery family traveled to other areas, as well, and must have been aware of one of the region’s top tourist attractions - Shakespeare’s Birthplace in Stratford-upon-Avon which was only 18 miles southeast of Redditch. William or another family member may have purchased a post card or other souvenir with a drawing of the famous house, as many tourists do to this day. This combination of knowledge of the Birmingham brass industry and an appreciation for the beauty of Shakespeare’s Birthplace appears to have led to the inspiration for two needle cases designed in the shape of this building. If we look at what was popular in Victorian culture, this will give clues about the inspiration for other needle case designs. For example, butterfly collecting was a popular pursuit of Victorian women--it was one of those things accepted as a kind of ‘scientific activity suitable for ladies’--thus the popularity of the butterfly as a design. This may have been the inspiration for the four needle cases W. Avery & Son produced with butterflies on them. Since no records exist today that explain how the firm selected their designs, one can only guess.
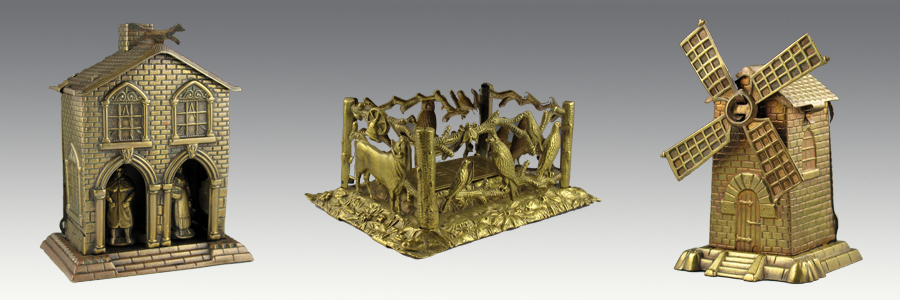
Although we know Avery generously supported the arts, we have no evidence that he had any artistic talent beyond his musical and writing abilities. Thus, his designs must have been realized through collaboration with other skilled craftsmen accustomed to turning design ideas into the patterns and templates required for manufacture. We know that Avery worked with the Birmingham jeweler, Coggins & Baxter, on at least two occasions, producing a windmill needle case and a lap desk needle case. Both items were patented to Coggins & Baxter but had the W. Avery & Son name inscribed or embossed on them. In the case of at least four other designs--the rowboat, cradle, barrel and penny stamp--Avery worked with the Birmingham die-sinker and metal box maker, Buncher & Haseler. Again the patents were issued in the die-sinkers name; however the finished needle cases contained the W. Avery & Son trademark.
Preparing the Design Sketch and Layout
The first step in turning one of Avery’s creative ideas into a finished product was to work with a jeweler, die-sinker or other skilled craftsman who could prepare the artist’s sketch required when one applied for a patent. To help understand how this process may have worked, let’s take a closer look at the small Shakespeare’s Birthplace Needle Case. Compare the sketch on the left side of the 1873 design registration patent (Figure 1) to an actual photograph of the building taken before its restoration in 1864 (Figure 2). Now compare the sketch in the patent to the actual needle case (Figure 3). Although the photograph and the needle case are quite similar, the patent sketch contains several minor differences. The actual needle case is squarer than the one on the patent, the number of horizontal half-timbered panels on the left side of the building is four on the patent whereas the actual needle case has five, and the roof is thatched, with the chimney placed in a slightly different position. This indicates the sketch for the patent was probably just a preliminary drawing. Another more detailed sketch must have been prepared by a production engineer who would turn the design into a pattern that could be used to make the needle case in brass.
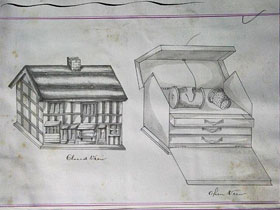
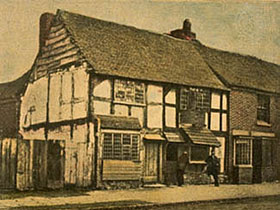
Figure 1 - Shakespeare's Birthplace sketch from the 1873 patent and Figure 2 - Shakespeare's Birthplace photograph taken prior to 1864.
The production engineer had to be an artist first and foremost in order to determine the size, shape and detailed pattern the case would take. In addition, he needed to have in-depth knowledge of metallurgy, and specifically the properties of brass. For example, how much pressure must be applied to brass sheet metal with a specific gauge or thickness to allow the pattern to be pressed into the brass and still contain sufficient detail without breaking or over-stressing the metal? If he designed a needle case that required too much or too little pressure, the result would be a product that didn’t have enough detail or broke during or shortly after it was manufactured. He would also need basic engineering skills to ensure the design’s technical components worked. One interesting feature of some brass needle cases is the clever way in which the needle packets are displayed. In the Quadruple Casket Needle Case a tiny lever slides from one side to the other, releasing a compartment where a needle packet of a specific size is stored. When the lever is moved in the opposite direction, that needle packet is retracted and a different size is displayed. In the Royal Needle Case the entire interior compartment slides partially out to the right or left to reveal four needle packets, two on each side. With the Revolving Needle Case the interior compartment is shaped like a semicircle and is attached with a small stud that allows it to swing in and out, displaying a needle packet compartment containing four different sizes.

Figure 3 - Small Shakespeare's Birthplace brass needle case.
The engineer also needed to determine how all of the pieces of the design would fit together to form the finished needle case. For example, the small Shakespeare’s Birthplace Needle Case consists of four separate pieces of brass: a wall, a base, a roof and a chimney (Figure 4). In order for the pieces to fit together tightly without solder, glue, hinges or screws, each piece contained a number of small tabs or slots cut out of the metal. The tabs of one piece fit into the slots of another piece and were then bent at a 90 degree angle to hold the pieces together. Note that the wall in Figure 4 has nine tabs and one slot. Tab T-1 fits into slot S-1 which when bent into shape (dashed lines represent the bend marks) forms the rectangular body of the house. Tabs T-2, T-3, T-4, T-5, T-6 and T-7 on the wall fit into slots S-2, S-3, S-4, S-5, S-6 and S-7 in the base. Tabs T-8 and T-9 on the wall fit into slots S-8 and S-9 on the roof. And lastly, tabs T-10 and T-11 on the chimney fit into slots S-10 and S-11 on the roof. The engineer had to take all of this into consideration when preparing the overall design for the needle case, to make it possible to assemble the pieces later. Presumably when the production engineer was done with his job there would be a detailed strip layout with all of the pieces arranged in whatever way made the most economical use of the raw materials. In addition, this would be accompanied by specifications listing the type, size and gauge of sheet brass to be used and the amount of pressure to be applied by the machine that stamped the brass to ensure design quality in the finished product. Lastly, information regarding assembly of the item needed to be prepared. These instructions would then be provided to the die-sinker who was responsible for turning the design pattern into a mold. W. Avery & Son most likely selected Buncher & Haseler because they combined a production engineer and a die-sinker in the same company. In fact, this firm could provide all of the services necessary to complete a needle case from start to finish, for they were was listed in the 1878 Post Office Directory of Birmingham as die-sinkers, stampers, piercers, tool makers and manufacturers of fancy metal boxes.
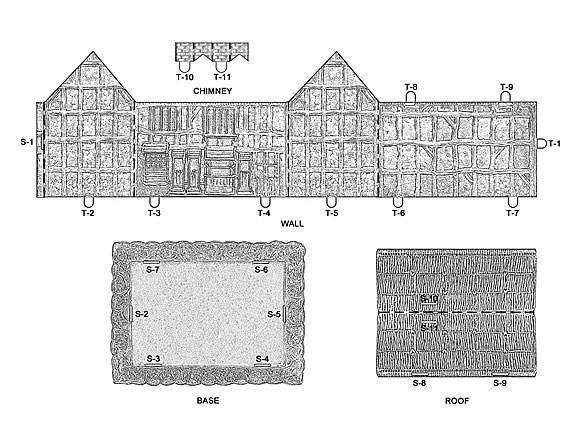
Figure 4 - Reconstructed drawing of the detailed design for Shakespeare's Birthplace.
Creating the Mold or Dies
The next step in the design process involved creating the molds that would be used to stamp or cast the design onto the brass or other metal. During the Victorian Era the two most common techniques for producing molds were sand-casting and die-sinking. Since several needle cases contain parts that were both cast and stamped, we must look at how both processes worked, however, because the decoration for most needle cases was made in low relief, stamping from molds engraved by a die-sinker was the more common practice.
When using the sand-casting method, a model in clay, wood or another flexible material was made using the strip pattern created by the production engineer. An artistically talented worker ensured the model received all the fine detail necessary to make the item appealing. With some designs a separate model needed to be created for each of the pieces that made up the needle case. After completion of the model, the first half of the mold was formed by pressing one side of the model firmly into a wood framed box filled with special molding sand. The same process was used to create the second half of the mold using the other side of the model. When the model was removed, the image was impressed in the cavity in the molds. The two halves were then clamped together and molten bronze, brass or some other metal was poured into the mold cavity. After the metal solidified, the sand molds were removed to reveal a perfect copy of the original model. A worker using special tools smoothed out any imperfections or distortions that occurred during the casting process, while accentuating the finer details. Figure 5 shows an example of a needle case with a solid cast part, a lion, resting on a stamped brass base.

Figure 5 - Lion on Plinth with cast lion and brass base.
With stamped brass, one used both positive and negative molds (called ‘dies’). The positive (or convex) die carried the pattern in relief, which meant the design protruded out from the background. The negative (or concave) die carried the pattern in intaglio (or in reverse), which meant the design was depressed below the surface so that an impression of the design recreated the image in relief. A die-sinker, who was an artist as well as a skilled craftsman, made the actual dies. For some patterns the dies already existed as some die-sinkers had pattern books of designs they had created in the past and all that was needed was to select the dies and arrange them to form the new design. However, due to the uniqueness of needle cases, the die-sinker usually would have had to create new dies. Today, die-sinkers and die-makers construct dies using computer-aided software, such as CAD/CAM. In the 19th century, however, it was done manually. Die-sinkers started with a piece of softened steel and used small, very hard, steel engraving tools to cut or sink the design pattern into the steel to create the negative die. This process resembled that of Albrecht Dürer, the northern Renaissance painter and master engraver, from the late 15th and early 16th centuries. Dürer incised copper plates to produce art works in reverse, which could then be used to create printed engravings. When making needle cases, after the engraved steel die was completed, it was placed in a container with a layer of bone dust or a mixture of charcoal and oil. This was heated until it was red hot, to carburize the steel, and then it was quenched in water to harden the steel. An impression in relief was made from this negative die on another piece of softened steel, to form the positive die. This positive die was then touched up and hardened in the same way.
Stamping the Needle Case
With the sheet brass rolled and cut to the proper specifications and the positive and negative dies engraved with the decorative pattern, all of the preliminary steps necessary to produce a needle case were complete. From that point, ordinary manufacturing processes took over, to turn that sheet of brass into the needle case in the design.
The first step of the manufacturing process involved stamping the brass with the pattern. Stamping was introduced into Birmingham in the late 1770s and, less expensive and more efficient than casting, became the preferred method for decorating brass objects. Elaborate designs could be more easily cut into the dies and the appearance of stamped brass could be enhanced during the final processing stage making it even more appealing. Stamping involved placing sheet brass between two dies attached to a machine called the stamping press. A series of runners or rollers fed the thin strip of brass into the machine and locked it in position when the press was activated.
Manufacturers used two types of stamping presses during the Victorian period, manual and pistol; the difference being the way in which the pressure was applied to the brass. The manual press consisted of three main parts. The base, which held the negative die clamped or secured in position with screws, was composed of a heavy cast-iron plate or bed sunk in the ground. Two cast-iron pillars, one on each side, held a cross bar at the top which held a hammer. The hammer, holding the positive die, could be raised and dropped by means of a pulley using the force of gravity to impress the design into the brass. This process was repeated until the desired sharpness was achieved, a process that required several stampers because the weight of the hammer was usually 112 lbs. or more. Between each drop, workers annealed the brass to soften it so the design could be more easily impressed. The number of drops depended upon the depth of the pattern on the die. In contrast, with piston-style presses, both dies were movable. The lower die was moved upward by hydraulic power at the same time that the upper die was forced down by steam. The two met with sufficient force to impress the design onto the brass. The piston process was much more efficient as it required fewer workmen and there was no need to anneal the brass. It isn’t clear which press was used to produce brass needle case stampings, although the piston-style press was most often used for stamping large-sized vessels. Both methods were in place and were described in manufacturing books written in 1866. Perhaps both were used for different needle cases depending upon the amount of detail in the design, degree of relief in the pattern or year in which the case was manufactured.
Adding Decorative Detail
Depending upon the design, special tools were needed to help the craftsman add the finishing touches to the needle case. These tools included the following: burrs, shanks, drills, files, punches, hammers, special stamps, clamps, vices, mallets, stakes and mandrels, which came in a variety of sizes. For example, repoussé and chasing were common techniques used in Birmingham to ornament or shape brass. Repoussé was accomplished by using a tool on the reverse side of the brass to create a raised pattern on the front, whereas chasing did the opposite. The two techniques were often used together to create a finished piece. Depending upon the size of the repoussé or chasing to be done, if the tool didn’t already exist, one had to be made before the work could be finished. Another example was the burr, which was used in cutting and engraving. Depending upon the size of the area to be worked, different style burrs were needed, such as a ball burr, cylinder burr, inverted cone burr, point burr, flame burr, etc. Again, if the correct size was not available, one needed to be created.
Once the brass was stamped, additional decoration could be added to the needle case using the correct finishing tool. The stamping process left excess metal attached to the needle case, which required filing so the edges would not cut the people who handled them. Imagine how sharp the edges must have been immediately after stamping! No one would be willing to purchase a needle case, regardless of its beauty, if they would get cut every time they picked it up. With some needle case designs, large sections needed to be cut out to create unique patterns. Figure 6 shows detail from the Cock Robin’s Grave Needle Case and Figure 7 from the Eiffel Tower Needle Case. Craftsman called ‘piercers’ used special tools, manually or mechanically operated, to punch holes into the brass to produce these elaborate designs. The ‘punch-press’ or ‘fly-press’ used a punch, special stamp or die that could be moved up and down by a screw fastened to a handle to which a pair of weights was attached, one on each end. When activated, the screw was turned, either manually or by power-driven machinery, allowing it to cut through the metal. Once again, after the brass was punched, any pieces of residual metal had to be removed, followed by additional filing.
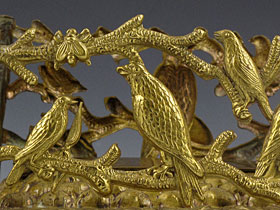
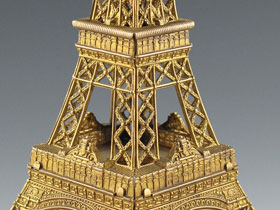
Figure 6 - Close up of the cut out detail on Cock Robin's Grave and Figure 7 - Close up of the cut out detail on the Eiffel Tower.
Craftsmen used chasing or engraving to add supplemental detail and ornamentation to the needle case. Chasing involved indenting the metal from the top to clarify or enhance the design that was stamped on the item. Often chasing gave the design that extra fine detail that contributed to its artistic appeal. Engraving was by far the most common embellishment added to needle cases. Birmingham craftsmen produced intricate patterns using tools that incised or cut groves into the brass to form the design. The Gardener’s Basket Needle Case in Figure 8 and the Postal Weight Needle Case in Figure 9 illustrate the degree of sophistication these workmen achieved. Amazingly, the engraver executed this elegant detail by hand so that a rose or spiral design on one side matched perfectly to another on the opposite side. Engravers often incised the company name onto a flat part of the case. Frequently, needle cases made to a specific design can be found with several different needle manufacturers’ names or trademarks, indicating the producer of the actual needle sold the finished product to several different companies.
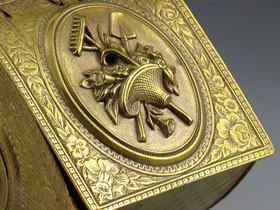
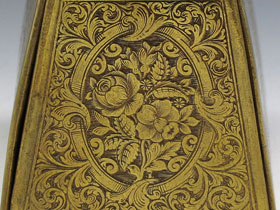
Figure 8 - Closed up of the engraved detail on the Coal Scuttle and Figure 9 - Close up of the engraved detail on the Postal Weight.
Assembly, Gilding and Electroplating
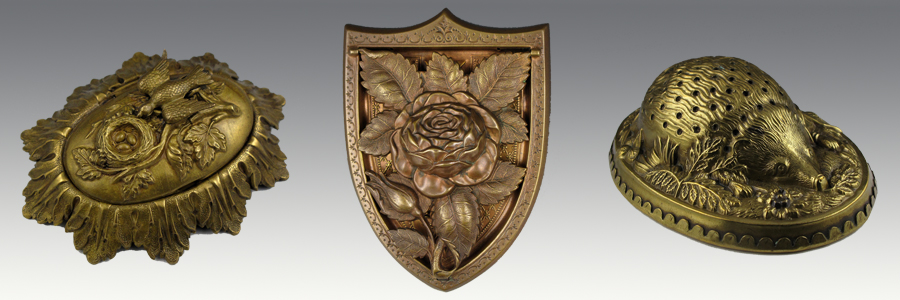
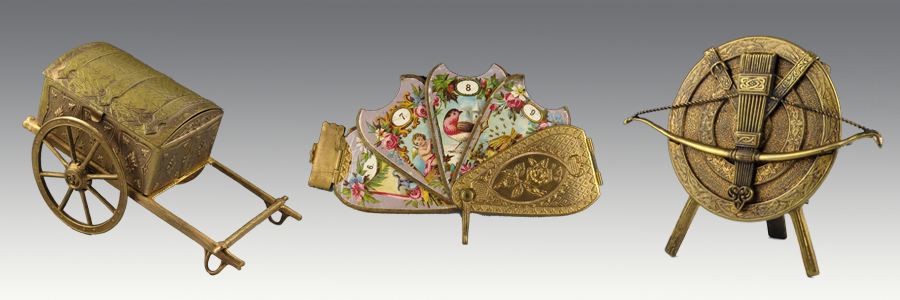
After applying the final decorative elements to the brass, a worker assembled all of the component parts into a finished product. Individual pieces were joined together in several different ways. As mentioned earlier, solder, glue, traditional hinges and screws rarely appeared on needle cases. Occasionally the brass was folded or bent so it wrapped around another section which held it in place. However, more often separate pieces were designed and stamped in such a way that they simply snapped together, with the protrusion made in one piece fitting into an indentation in the other. This is illustrated in the Hedgehog Pin Stick Needle Case in Figure 10 where the decorative top fits tightly into the scalloped bottom. Sometimes, a small portion of brass on one piece was twisted to form a clasp that held the two pieces together, as in the trunk of the Golden Cart Needle Case in Figure 11. The use of small tabs that fit into opposing cut-out slots was another fairly common joining technique. The workman assembling the needle case needed to follow the instructions prepared by the design engineer in order to determine which tab fit into which slot. Figure 12 provides an example of how the wall of the Shakespeare’s Birthplace Needle Case was attached to the base by the use of tabs inserted into slots which, when bent at a 90 degree angle, held the pieces together. On some needle cases several small tabs were placed near each other with open spaces between them of equal size. The part to be joined also contained a series of tabs with open spaces but these tabs were aligned perfectly to the spaces of the opposing piece. Instead of dovetailing, all of the tabs were bent around a thin piece of wire which created a mechanism similar to a hinge. In this way the top section of a needle case was attached to the bottom and could be opened and closed easily, as in the Walnut on a Leaf Needle Case in Figure 13. Prior to assembly, all parts that needed to be bent or manipulated were annealed to soften the metal and prevent breakage. Most needle cases employed at least two of the joining techniques described here.
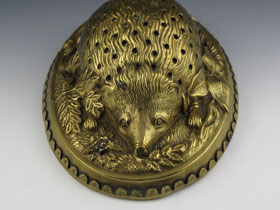
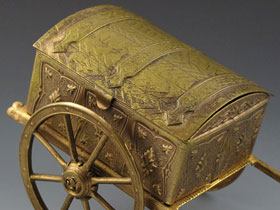
Figure 10 - Hedgehog composed of two pieces held in place be fitting into each other and Figure 11 - Close up of the Golden Cart showing the clasp on the trunk.
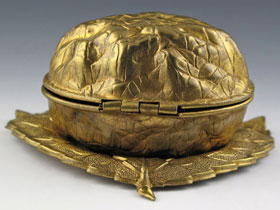
Figure 12 - Bottom of the small Shakespeare's Birthplace showing the bent tabs holding the base in place and Figure 13 - Back of the Walnut of Leaf with built in bent tab hinge.
Occasionally a needle case would be electroplated or gilded to enhance its appearance. Electroplating involved placing a thin layer of gold, silver or nickel onto an object made of another metal, such as brass, bronze or copper. Needle cases were most likely plated with nickel to give them the appearance of silver. At least one needle case, The Silver Casket, had the words ‘nickel plated’ engraved on the front. An older plating process had been around for years, however electroplating proved less expensive because it required less metal and could be done in a more efficient manner. Before plating began, the needle case required thorough cleansing, a process that involved boiling the item in potash to remove any grease or dirt, dipping it in diluted nitric acid to remove rust or oxide, and then scouring it with fine sand. A bath, consisting of water, sulfate of nickel and ammonium, was prepared in a container made of a non-conductive material such as earthenware to which a plate of nickel was added. Prior to immersion, workmen attached the items to be plated to a metal rod and then submerged them in the solution. They connected the nickel plate to the positive pole of a battery, and the metal rod, on which the items were hung, to the negative pole. The electrical current passing through the solution caused the nickel from the sulfate bath to condense on the object, while the nickel from the plate dissolved and became nickel sulfate. The length of time the item remained in the bath determined the thickness of the plate. The Hector Needle Case in Figure 14 provides an example of electroplating; however, this item may have been submerged too long, for the plating is quite heavy, which reduces the amount of detail or clarity in the design. Although over 125 years have passed since this item was electroplated, only now, with close examination, can one see evidence of wear in the plating.

Figure 14 - Close up of the electroplated Hector with underlying brass showing through.
Gilding was also used to give objects a thin coat of gold. Although identical to nickel electroplating, gold plating had less durability because the thin layer of gold oxidized and wore off quickly. As a result, manufacturers preferred another method of gilding which involved mixing gold powder with mercury to form a paste that was applied to the item. Heating then caused the mercury to evaporate leaving the gold powder adhered to the surface. Occasionally the appeal of some gilt needle cases may have waned as the years went by. This can be seen in the large Shakespeare’s Birthplace Needle Case in Figure 15. Here the thickly applied gilt has concealed the fine detail in the design, and as the item aged, portions of the gilt deteriorated and oxidation caused parts of the brass to discolor leaving the item spotty and unattractive. Removal of the gilt from this needle case restored its beauty as evidenced in Figure 16, which shows substantially more fine detail. During the removal process, tiny flakes of gold remained on the cloth used to clean the piece, evidence that the original gilding used the gold powder process.
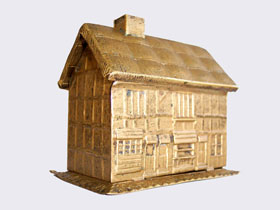
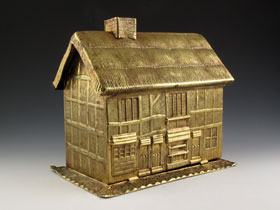
Figure 15 - Large Shakespeare's Birthplace with gilt and Figure 16 - Large Shakespeare's Birthplace with gilt removed.
Finishing the Needle Case
The final stage in the manufacturing process involved improving the appearance of the brass and protecting it through dipping, burnishing, lacquering and, in some cases, bronzing. Dipping, which involved immersing the object in an earthenware vessel containing nitric acid, altered the surface finish of the brass. The length of time the item remained in the solution and the strength of the acid determined the intensity and type of finish. Items dipped for a short period of time in strong acid resulted in a bright shiny surface. When brass objects remained submerged in weak acid for a longer amount of time, however, the finish became dull and flat. After dipping, the item was again rinsed and then dried in sawdust. Each needle case was further enhanced by burnishing or polishing. Steel tools brightened or highlighted the protruding sections of the design, providing contrast to the duller, indented parts. The burnishing process gave the overall item a much more appealing appearance. Occasionally an item was bronzed to give it a distinctive patina or antique look, which involved spreading a layer of yellowish to olive brown pigment over the item by dunking it in various diluted acids, such as hydrochloric acid and arsenic. As with dipping, the type of acid and the strength of the solution determined the shade and intensity of the color. Lastly, the brass needed to be protected from oxidation and tarnishing after the item was exposed to typical atmospheric conditions. After heating, a thin layer of transparent varnish called lacquer was applied uniformly over the entire surface of the needle case using a special brush. A second heating hardened the lacquer. Unfortunately, few needle cases can be found today with their original finish. In most cases the patina they now have took many decades to develop naturally. Due to its dark brown luster, however, the Shield with Rose Needle Case in Figure 17 demonstrates what original bronzing may have looked like.
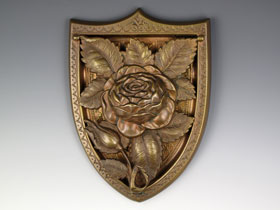
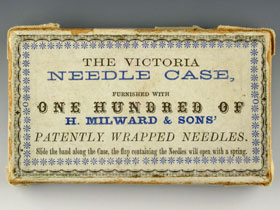
Figure 17 - Shield with Rose possibily bronzed and Figure 18 - The Victorian Needle Case presentation box.
Inspection and packaging took place before the needle case went to the needle manufacturer for sale. Presumably brass items had to meet rigorous standards established either by the manufacturer or the company for which the item was produced. Were there any cracks in the brass? Was there sufficient detail and clarity in the stamped design? Did the parts that were joined together fit correctly? Did the clasp, if there was one, work properly? Did the hinge allow the case to be easily opened and closed? Were there any mistakes in the engraving? Was the needle manufacturer’s name correctly engraved or stamped on the piece? Were the sections that held the needle packets satisfactory? If the inspector discovered a flaw, he would have to assess whether it could be corrected. Some defects could probably be repaired whereas others could not. All needle cases that passed the inspection process were packaged for distribution, though we don’t know at what point the needle packets were actually inserted into the needle case. This may have been done at the location where the needle case was produced or it may have been done later in Redditch by the needle manufacturer. Only a few examples of needle case packaging exist today, probably because the materials have disintegrated over the last 125 years. The Beatrice Needle Case and the Unique Needle Case were sold in a plain rectangular presentation box that resembled leather and contained no decoration or lettering. Rarely one of these needle cases can be found with its original presentation box. The only other packaging I have seen during 20 years of collecting is illustrated in Figure 18, the presentation box for H. Milward & Sons’ Victoria Needle Case. This rectangular box, identical in shape to the needle case inside, was made of thin cardboard. The exterior label clearly identified the needle manufacturer, the quantity of needles and the needle case within. One can only assume that this presentation box is a fairly accurate depiction of what the packaging for other needle cases may have been like.
Needle Case Sales and Distribution
To date I have found no evidence indicating how many needle cases of each type were made or how they were distributed. Because needle manufacturers requested their production, needle cases were most likely used to promote the sale of needles. Needles were a necessity for the professional tailor or seamstress, and they were also needed by working class families who could not afford premade clothing and had to make their own. But these were not the people purchasing needles sold in whimsical brass needle cases. By the 1860s and 1870s the Industrial Revolution had created a large middle class which had much more disposable income than in previous generations. In addition, during the Victorian Era middle class women often found themselves restricted to activities within the family residence. As a result, more women had time to pursue hobbies and other marginally useful activities at their homes. Embroidery became one of these acceptable diversions Middle class female embroiderers thus became the primary market for decorative needle cases because they could afford them and they enjoyed having something interesting and attractive to display on the drawing room table. Crochet must have been popular as well, because W. Avery & Son also produced crochet hooks with decorative brass cases like the ones in Figure 19. Popular patterns, fabric, thread and, of course, needles were probably acquired from local merchants who specialized in these items. Needle manufacturers certainly distributed their needle cases to these types of stores. W. Avery & Son and others took their sales plans a step further by attending international exhibitions and other special events as a way to advertise their products and reach out to merchants and consumers in Great Britain and on the Continent.
Figure 19 - W. Avery & Son crochet hook cases.
Given their cost, Victorian needle cases would have been treasured by their owners more for their appearance than for their use, and some ladies may have collected them, always on the lookout for the latest new designs. Needle cases, like other Victorian valuables, may have been passed on to another family member to keep as an heirloom, a memento of the person who originally owned it. Others may have been lost when an estate was broken up and sold--not all agents or buyers would have known the value of such items. Although the majority of items in everyday use during the Victorian Period have not survived, needle cases would have had a better chance than less valuable items, such as the needles they contained. Those that survived probably passed through a number of different hands before being purchased by an antique dealer, who in turn sold them in a shop, at a booth at an antique show or by auction online. Nevertheless, many of these needle cases now reside in the hands of a collector where they remain until the end of that person’s life. Then the process begins again, the needle case finds a new home, or perhaps someday a permanent place in a museum.
Summary
Now that we have a thorough understanding of what was involved in producing a needle case, we need to ask ourselves one question. What is a fancy brass needle case? In reality it is just a few handfuls of rock or earth that have been transformed into something of beauty by man. And not just one man. Each needle case passed through at least as many hands as the needle did on its journey to becoming a finished product. Therefore each needle case represents all of the people involved in producing it. And who were these people? Most were working class men and women who could not afford the item which their hands labored to create. Many of these people worked long hours and endured significant hardships, such as operating dangerous equipment and being exposed to hazardous chemicals. This took a toll on their families, and on their health and life expectancy. Although William Avery receives most of the credit for inventing fancy brass needle cases, these workers were the unsung heroes who risked their lives to produce the needle cases that now reside in our collections. We should always strive to remember them even though their individual names are long forgotten.